Piano Tuning Tutorial
With patience and attention to detail, anyone can learn how to tune a piano. Whether you’re a musician looking to “touch up” your piano between regular professional tunings, or a DIYer wanting to give new life to an old instrument, this website aims to be the best free piano tuning tutorial on the internet.
This tutorial is divided into three main sections. The first section focuses on acquiring the proper tools. Unlike other tutorials that attempt to teach the complicated process of “tuning by ear”, this guide recommends using free or affordable piano tuning software. The second section will guide you through opening and familiarizing yourself with your piano. The third (and longest) section breaks down the tuning process into steps, ending with advanced techniques that will help you achieve a clean, stable tuning that can last through even hard playing.
Piano Tuning Tutorial
With patience and attention to detail, anyone can learn to tune a piano. Whether you’re a musician looking to touch up your piano between regular tunings or a DIYer wanting to give new life to an old instrument, this website aims to be the most complete and accessible piano tuning tutorial on the internet. In just a few hours, you should be able to do a basic tuning on your piano without breaking anything.
This tutorial is divided into three main sections. The first section focuses on acquiring and gathering the proper tools. Unlike other tutorials that attempt to teach the complicated process of tuning by ear, this guide recommends using free or affordable piano tuning software. The second section will guide you through opening and familiarizing yourself with your piano. The third and longest section breaks down the tuning process into steps, ending with advanced techniques that will help you achieve a clean, stable tuning that can last through even hard playing.
Introduction
Reasons to tune your own piano
Here are some reasons you might consider trying to tune your own piano:
Reasons not to tune your own piano
Interested in Becoming a Professional Tuner?
If you’re musically and mechanically inclined, dissatisfied with traditional employment, or looking for a side gig, piano technology might be an attractive trade for you. A reasonable first step for anyone seriously considering becoming a piano technician is to acquire an inexpensive old piano to practice on. You might tune that piano several times and then start exploring regulation and repairs.
If you’re interested in becoming a professional, this guide will teach you the basics of how to tune a piano, but after that you will want to explore the “further resources” linked at the end of this tutorial.
Preparation
Use the right tools for the job! Do not use vise grips or socket wrenches. They don’t work, and they will damage the tuning pins. Using the proper tools will make the job easier.
The following sections will give you some quick all-in-one kit recommendations followed by a more detailed discussion of specific tools and software. Expect to pay up to 100 US dollars for a reasonable quality kit.
Kit recommendations
Under$100

Tools:
- Howard Professional Piano Tuning Kit ($60) (Choose Tuning Hammer with Wood Handle + One piece 10 degree head and #2 tip).
- Optional for upright pianos: Papps Treble Mute (Howard: $20, or Amazon: $10 for lower quality)
Software: (Choose one)
- PianoMeter Plus version ($30)
- TuneLab free trial (Android only)
Under$60

Tools: (choose one)
- Howard Piano Tuning & Mute Kit ($33) with gooseneck tuning lever
- Amazon.com kit ($26) (Many options, most of them lower quality…see below)
Software: (choose one)
- TuneLab free trial (Android)
- PianoMeter Plus version ($30)
- Entropy piano tuner (free, but less user friendly)
Avoid cheap Amazon kits

Amazon is littered with piano tuning kits with throwaway brand names like TADYAO, XUYIYUE, CUGLB, ECLOUD, TIPATYARD, and YAETEK. Many of these are low quality tools that will make your life more difficult and potentially damage the tuning pins.
Detailed tuning lever recommendations
(ranked worst to best)
The tuning lever, sometimes called a “tuning hammer” is your most important tool. It’s important to get something that has a tapered star tip that will fit the tuning pins on your piano. (Many of the levers sold on big e-commerce sites like amazon.com have tips that are not tapered properly.) Unless the tuning pins on your piano are abnormally small, choose a #2 size tip.
A good tuning lever will be reasonably stiff, not too heavy, and comfortable in your hand.
Garbage Amazon levers (<$10)
Avoid anything that looks like this. It has a square tip (not star) with zero taper. The handle is too short to be of any use, and is of such low quality that you can break it with your bare hands.
Cheap Amazon levers (~ $20)
There are several brands of Amazon levers costing less than $30 that have different shaft and handle shapes but the same low quality tip. While the tip does have some internal taper, it is not enough to correctly fit the taper of a piano tuning pin.
Goosenecks (~ $25)
A solid gooseneck like this American-made lever sold by Howard is a small step above the cheaper Amazon levers. The tip on this AMS lever is profiled correctly, but the lever itself is too flexible for professional use. Make sure to get a #2 star tip.
Student levers (~ $50)
Some retailers (see “Howard” below) market these as “professional” levers, but professional piano tuners consider them “beginning” or “student” levers. These levers represent the minimum of what a professional would use on a regular basis. They have interchangeable heads. Slightly stiffer than a Gooseneck.
Professional levers (> $100)
Anything over about $100 is a professional lever. These have interchangeable heads and tips. The lever pictured here is an “extension” lever that you can make longer for more leverage. The lever is reliable, reasonably stiff, and somewhat heavy.
High end levers (> $300)
While there are some excellent levers in the $100-150 range, there is another class of more exotic levers in the $300-750 range for professional piano tuners. These levers are optimized for light weight, high stiffness, balance, and ergonomics. The top “Cassotto” lever (~$750) and the bottom “Fujan” lever (~$350) both have ball handles, carbon fiber shanks, and sturdy tip assemblies that allow the tuner to really “feel” the tuning pin move in the pinblock.
Reliable places to buy tuning levers
Mutes
Wedge Mutes
You should buy at least 2 wedge mutes. You can get rubber mutes felt mutes. Wider, shorter mutes are better for grand pianos, while longer, narrow mutes with handles work well for uprights.
For upright pianos, a dedicated treble mute that fits between hammer shanks, such as the spring-loaded “Papps Mute” is optional, but recommended for convenience. You can get away with using just your regular rubber mutes for the treble, but be prepared to spend extra time retrieving your mutes when they fall out.
Many kits include a long red felt temperament strip mute, but you won’t need that for the tuning method taught here.
Software/apps
Don’t Use Generic Tuning Apps.
The app Pano Tuner (not a typo) is often the first result when you type “piano tuner” into the app store. It’s a great app, but it’s not suitable for tuning pianos. Metronome tuners like the popular Korg TM-50 won’t work for tuning pianos either.
Generic chromatic tuners and tuning apps don’t have the proper “stretch” that is required to make a piano tuning sound good. They won’t be able to correctly tune anything outside the middle couple of octaves, and they don’t do that particularly well either.
Real piano tuning software needs to be able to calculate a custom tuning for your piano based on measurements of the piano’s tone. Below is a “Railsback curve” graph showing what a custom “stretched” tuning looks like (dark black line with the blue dots) versus a generic tuning app would target (the gray horizontal line).

TuneLab
(Free/$300)
TuneLab has been around since the 1990s and is widely used by professional tuners. While a full license for this app costs $300, the Android and Windows versions are free “shareware” downloads that have full functionality, interrupted by periodic prompts that block you from tuning for a 2 minutes while you consider upgrading to a full license. With this minor inconvenience, TuneLab is a good free option for beginners and hobbyists who don’t want to dump a bunch of money into software they may only use once.
TuneLab for Android/Windows is downloaded directly from the developer’s website at tunelab-world.com and must be side-loaded onto Android devices. (It’s easier than it sounds, and there are instructions on the website.)
PianoMeter
($30/$350)
PianoMeter is a newer piano tuning app released in the late 2010s that is also used by professional tuners, but has a less expensive upgrade tier specifically for hobbyists and home users. The app itself is free to download, but requires an in-app purchase to tune a piano. The “Plus” tier for hobbyists only costs $30. The “Pro” version, with features geared toward professional piano tuners, costs $350. To tune your own piano, you’ll be fine with the Plus version.
PianoMeter is available for iOS and Android on the Apple App Store and the Google Play Store.
Entropy Piano Tuner
(Free)
A third choice that is completely free and open source is Entropy Piano Tuner. Unfortunately Entropy is difficult and inconvenient to use, and the app is not well-maintained. As of this writing the app has been removed from the Apple App Store and the Google Play Store, and the official webpage also seems to be down.
For these reasons, this tutorial will not include specific instructions for using Entropy Piano Tuner. The app itself includes some basic instructions in a helpful “Quickstart Guide” that you can access by tapping on the red and white ring buoy icon 🛟 in the top right corner. By following the Quickstart instructions there and the other instructions in this tutorial, you should still be able to tune a piano with Entropy.
Other apps
Other apps that have moderately priced (~$100) tiers for home users include PiaTune and PianoScope. But overall professional piano tuning software is relatively expensive, costing from $300-$1000. A fairly comprehensive review of existing piano tuning devices and software is at https://www.davidboyce.co.uk/electronic-tuning.php
Opening the piano
Once you’ve got the appropriate tools and software, the next step is to open the piano so you can access the strings and the tuning pins. Most pianos are similar enough that these general guidelines will apply, but there are many small differences between brands and types of pianos, so opening your piano may require some steps not listed here. Careful observation should get you most of the way, but if you get stuck, then be prepared to search the internet or ask for help in one of the forums mentioned at the bottom of this tutorial.
Opening a Grand piano
- Open the lid and prop it up.
- Remove the music desk.
- Fold down the music desk (where the music rests).
- Close the fallboard (the lid that covers the keyboard).
- Try sliding the whole music desk towards you. On most pianos, it will simply slide right out and you’re done. Make a note of how it fits so you can put it back in later.
- If the music desk doesn’t slide at all, try lifting it straight up out of the piano, or look for screws holding it down.
- If it does slide but doesn’t come out, you might need to slide it to the middle of its range while gently lifting on one side so a tab can come out of a slot. (Common on Steinway pianos.)
- If all else fails, search the internet for your model of piano. There are thousands of models, and covering them all is beyond the scope of this guide.
Opening an Upright piano
1. Move the piano away from the wall. You don’t want to damage the wall when you open the top. A couple inches (several cm) is usually enough.
2. Open the top of the piano. You can do this on over 90% of pianos by simply lifting the front lip of the top, but there are exceptions that might require careful observation and experimentation on your part. Here are some exceptions:
- Look for screws holding the top down. They may be on top, or in rare cases (some Everett pianos) on the back.
- See if more than just the top lid opens. On some Baldwin pianos, you must first open the key cover, then lift up the entire front of the piano.
- Sometimes there are cabinet catches on the underside of the lid holding it down. In this case, you just need to lift harder.
- Some pianos have a design where the lid has a short hinge on the left side of the piano and the lid is lifted from the right. In this case, it’s usually best to use pliers to remove the hinge pin and take the lid off entirely.
3. Prop the lid open. Often this involves leaning it back against a wall with a soft cloth draped over the top so it doesn’t rub against the wall.
On Baldwin pianos where the whole front lifts, there’s a hidden prop that swings down from the left side.

4. Remove the front board, if applicable. Usually this board is held on by some sort of latch in the top left and top right corners. Find the latch or attachment mechanism, figure out how to release it, then lift the entire front board off and set it aside. Types of latches:
- Twisting: Most common. A simple twist of the latch will release the corner of the front board. Standard for most newer pianos.
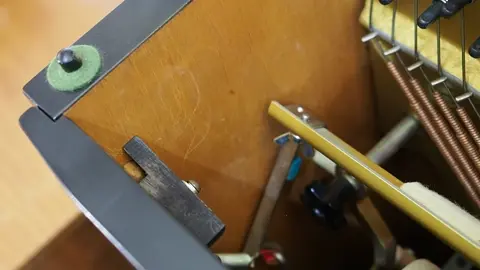
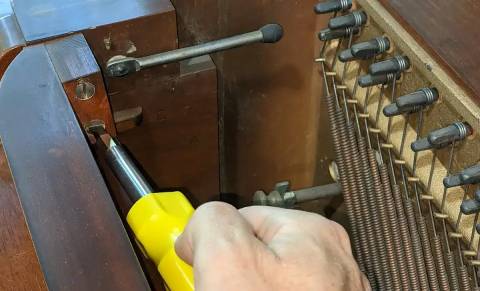
- Screws: The front board is held on by 1 or 2 screws on each side. Remove the screws and set them aside. Common on older/smaller pianos.
- Lift off: The front board is just hanging on hook-shaped pieces of wood, and all you need to do is lift the whole thing up. This is common on very large old uprights where the front board swings out when you open the key cover.
5. Remove the practice mute, if there is one. Don’t lose any felt “doughnuts” insulating the metal from the wood.
- On newer pianos there’s often a single screw or wing nut you can loosen to remove the left side, and then you can carefully pull the right side out of the hole on the side of the piano.
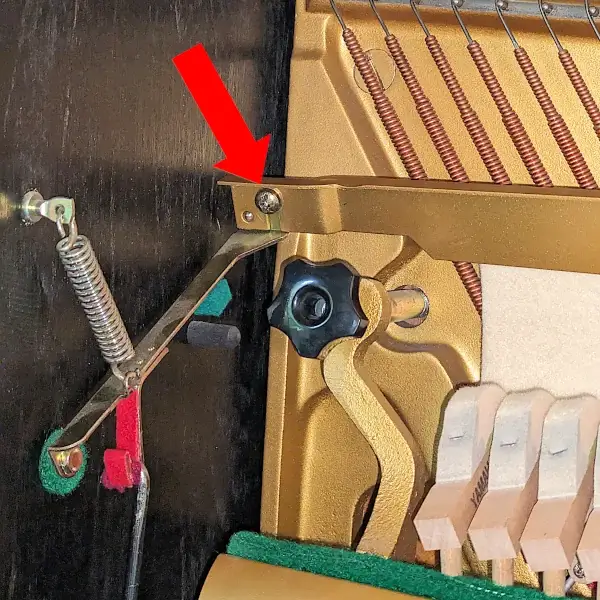
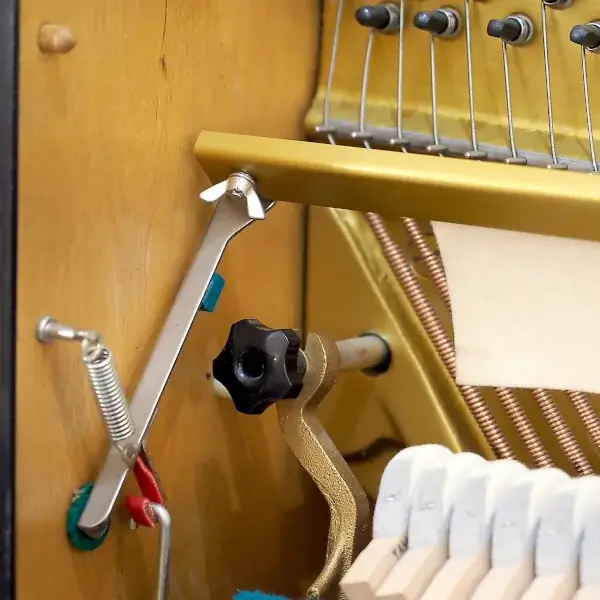
- On older pianos, you might have to disassemble the left side more to get it out. If there is a return spring pulling up and a pedal rod pulling down, you may have to remove both the spring and the pedal rod and pop the arms of the mechanism out of the holes on the left and right sides of the piano.
- On very old pianos, there might be one or more screws on the right side that you need to remove from a wooden pedal rod, or screws instead of nubs securing the mute rail to the sides of the piano.
6. Optional but often recommended: Remove the fallboard (key lid). This might be necessary for medium pianos to prevent the fallboard from resting against the action parts when the front board is removed. On smaller pianos removing the fallboard can give you better access to the strings.
First, examine the mexhanism and remove any screws holding the thing in, then, while supporting it with both hands, lift it out.
Pro tip: stabilize temperature and humidity
Make sure the temperature and humidity in the room will be stable while you tune the piano. Close windows and vents to avoid drafts, and close the curtains if there is a chance of a sunbeam passing over the piano while you tune. Because the temperature of the strings can change the overall pitch of a piano, a temperature swing during the tuning process will result in a piano that is out of tune with itself.
Get to know the inside of your piano (strings & Pins)
If this is your first time looking inside a piano, you might feel completely lost looking at the forest of tuning pins and trying to figure out which pin is connected to which string. Take some time and familiarize yourself with the inside of the piano. Play some notes to see how pressing a single key causes the hammer to strike a group of three strings. Learn to see the tuning pins as vertical columns of three pins, each connected to the three strings of a single note.
In this picture of an upright piano, the top tuning pin in each column connects to the left string, the middle pin to the middle string, and the bottom pin to the right string. Grand pianos follow a similar pattern.
Pick an order to tune the strings (example: left to right) and stick with it. Consintency will help you quickly learn the correct pattern to move the tuning lever from pin to pin. The biggest risk of tuning your own piano is accidentally turning the wrong pin—one connected to a muted string or a different note’s string—and breaking the string.

Tuning the piano
In the following sections you will learn:
- How to use your tuning software. How to take measurements so the software can calculate a good tuning, and how to read the display so it can calculate a good tuning for your piano.
- How to position your tuning lever and mutes.
- How to turn the tuning pin, and how close to the correct pitch is “close enough”
- How to manipulate the tuning pin to get a stable tuning.
Before you dive in to tune the whole piano, you should take some time to practice these skills on a single note.
Pre-measurement with TuneLab or PianoMeter
Both PianoMeter and TuneLab require you to pre-measure several notes on the piano. TuneLab asks you to measure 5-6 notes across the range of the piano, usually the notes C1, C2, C3, C4, C5, and C6. PianoMeter also requires several notes across the range of the piano, but you can measure whichever notes you want by simply playing them. (There’s no preferred sequence or limit to the notes.)
Best practice is to mute all but one string when you are pre-measuring notes.
TuneLab pre-measurement
- Tap on the “File” icon in the top right,
 then select “New Tuning”
 - Tap on the “Measure” icon at the bottom.
 This should switch the note to C1, and the following will appear:
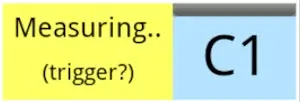
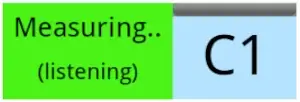
- Play the note C1 (the lowest C on the piano). The “Measuring” box will turn green. Hold the note for a few seconds so TuneLab can analyze its tone.
- TuneLab will analyze the note and then display a table of “Inharmonicity Measurement Results”. If the numbers in the middle “Offset” column are increasing in value, tap “Save” and move onto note C2. Otherwise tap “Discard” and measure C1 again.
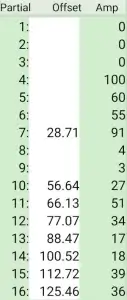
- Repeat step 4 for the other Cs on the piano, up to C6. The “Offset” values don’t all need to be filled, and you will get fewer and lower values for higher notes.
- Click the Tuning Curve button
 to review the tuning curve to make sure it has a nice “Railsback curve” shape. It might look something like this:
 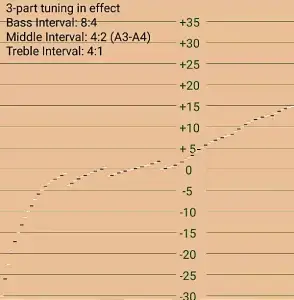 The black dashes in this graph represent black keys and the white dashes represent white keys. Don’t worry about the discontinuities (breaks) in the line. Those just show where TuneLab will switch to listening to a different partial (harmonic) during the tuning process.
 - Go back to the main screen. Save the tuning if you want to (File menu
 “Save tuning”.) You’re ready to tune.
PianoMeter pre-measurement
- Select “New tuning file” from the startup screen. Or open the menu with the button in the top-left corner
 and select “New tuning file.”
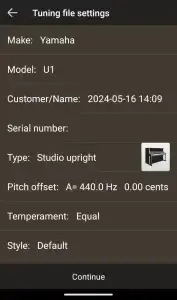
 - Name the tuning file and add details about the piano if you want to. Then click “Continue” at the bottom of the screen.
- Play several notes between A0 and C7. PianoMeter will automatically analyze each note and use its data to refine the tuning curve for the piano. Watch the following animation to see how the tuning curve updates from its generic default as one measures first the A notes and then the D# notes (splitting the octave in half).
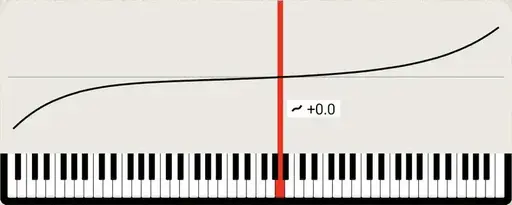 Note how the tuning curve changes drastically at first and then stabilizes as you measure more and more notes. The more notes you measure, the better. (You can measure them all in less than 2 minutes). The thing PianoMeter is analyzing in this process is called inharmonicity. If you swipe left on the Tuning Curve graph, you can see the Inharmonicity graph. Here is a second animation showing that graph while the same notes as above are measured.
 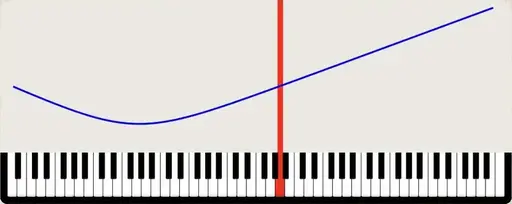 It is normal to have blue dots that aren’t exactly on the “best fit” line, but if there is a blue dot that is way off, try measuring that note again. You can delete a measurement by long-pressing on the graph.
 - Optional: Lock the tuning curve against further changes by pressing the “ear” button.
 If you don’t do this, PianoMeter will continue listening and refining the tuning curve even as you tune. There’s no harm in this, in fact, it’s good practice to leave it unlocked the first time you tune a piano, so you can get as refined a curve as possible. But if you don’t like the idea of the tuning targets changing slightly while you’re tuning, go ahead and lock the curve.
Reading the pitch of a string
- With PianoMeter, you can see the instantaneous pitch of the note you’re playing by looking at the dial.

This note is about 5.5 cents flat.

This note is precisely in tune.
- TuneLab also shows the instantaneous pitch, just to the right of the note name.

This note is about 2.5 cents flat.

This note is precisely in tune.
- Both TuneLab and PianoMeter have strobe-like indicators that move left or counter-clockwise when a note is flat, right or clockwise when a note is sharp, and that stop moving when a note is in tune.
Optional: Pitch-raise or rough tuning pass
While you’re doing the pre-measurement steps above, pay attention to the pitch of the piano. PianoMeter makes this easy, as you can just look at the graph to see if the blue dots are significantly below the black tuning curve line. With TuneLab, you will need to look at the pitch indicator while you play the notes to get an idea of where the piano is.
If the piano is more than 10-15 cents flat overall, consider tuning the piano in two passes: a rough tuning, followed by the fine tuning. This will help the piano be better in tune when you finish.
In a rough tuning or “pitch raise” pass, you will actually want to overshoot the target pitch a bit to get ahead of the natural settling process that happens as you raise the tension on all the strings. If a piano is 100 cents flat and you tune each note precisely in tune (zero cents), by the time you finish the piano will be over 20 cents flat again. So you actually want to tune that piano 25-30 cents sharp, so that it will be close to in tune when you finish the rough tuning pass.
TuneLab and PianoMeter both have pitch-raise/over-pull modes where they calculate how far to overshoot the pitch for you. However the pitch raise mode in PianoMeter is paywalled behind the Pro version, so you’ll have to do a little mental math while you tune (explained below) if you use PianoMeter.
TuneLab Pitch Raise Procedure
1
Activate Over-Pull mode from Settings  > Over-pull.
2
Start “Pre-measuring” by tapping the “Start” button. TuneLab needs to listen to the piano to determine where the pitch is and calculate the overshoot targets.
3
Play the notes indicated by TuneLab, one by one. The default is a C-Major triad starting at C1 (the lowest C) and going up the keyboard. So C1-E1-G1-C2-E2-G2…C8.
4
Review the Pre-measurements page to make sure everything looks reasonable. You can delete any numbers that look like errors.
5
Optional: On the main Over-pull setup page, you can tap a wrench icon lower down to edit “break settings” like the name of the highest note with copper-wound strings. This will refine the overshoot targets to better adapt to the shape of your piano. Don’t mess with the Limit settings…they’re there to protect you.
6
Back out of the Over-pull screens to the main tuning screen. TuneLab is now in Over-pull mode, and an offset has been added to each pitch target.
7
Start at A0, the lowest note on the piano, and tune upward to the top of the piano, ending with note C8. The goal is to tune until the strobes stop and the “peak” in the spectrum graph is centered on the middle line.
8
When you’ve finished the rough tuning pass, go back to Settings -> Over-pull and click the button to “Stop using over-pull”.
PianoMeter Pitch Raise Procedure
1
Find the lowest note in the middle section of the piano (the one furthest left before the break dividing the plain wire strings from the copper-wound bass strings. Play that note and use the dial to estimate how flat it is. (Zero is perfectly in tune.)
2
Tune the note approximately 25% sharp of however flat it was. If the note is at -10 cents, you tune to +2.5 cents. If the note is at -20 cents, you tune it to +5 cents.
- -50 cents -> +13 cents.
- -100 cents -> +25 cents.
Don’t tune it more than +30 cents sharp of zero.

3
Repeat step 2 for every string in the middle section of the piano, left to right, overshooting zero by 25% or 1/4 of however flat the note was before you began tuning it.
4
When you get to the strut separating the middle section from the treble, increase the overshoot to about 1/3 or 30%.
- -10 cents -> +3 cents
- -15 cents -> +5 cents
- -20 cents -> +7 cents
- -30 cents -> +10 cents
- -50 cents -> +17 cents
- -100 cents -> +30 cents
- -150 cents -> +30 cents (don’t overshoot more than 30 cents!)
Tune to the very top note of the piano.
5
Finally, tune the bass section, starting at the highest string and proceeding left. Overshoot by 10%.
- -10 cents -> +1 cent
- -20 cents -> +2 cents,. etc.
You don’t have to do the mental math for every note you tune…if you notice that most of the strings in the treble are around -60 cents, you can just tune everything to +20 cents. You don’t have to be precise! This is just a rough tuning.
Tuning lever position
When you are tuning, try to keep the handle of your lever pointed between 12:00 🕛 and 2:00 🕑 assuming you are holding the lever with your right hand.
On an Upright, this means the lever is pointing toward the ceiling, and slightly to the right. On a Grand, the lever will be pointed away from you and to the right. If you choose to hold the lever with your left hand, you might end up with the lever at 10:00-11:00 on an upright.
For right-handed tuning, position yourself in front of the keyboard, to the right of the note you’re tuning, and with your body pointed diagonally to the left. On shorter pianos and grand pianos you may sit or stand, whatever is comfortable. For taller uprights you’ll probably need to stand to keep your right elbow below the level of your shoulder.
Mute positioning tips
You will move the mutes differently depending on what order you choose to tune the strings of each note (left to right vs right to left) and whether you are tuning each string individually to the app, or just tuning one string to the app and tuning the remaining two by ear. You are welcome to move the mutes in whatever way you want, here are four patterns that could save you time by minimizing the number of times you have to move mutes.
Pick one pattern, memorize it, and stick with it to minimize the risk of breaking strings by putting your lever on the wrong pin. If in doubt, pick Pattern 1 or 2.
Requires only 1 mute. This is the easiest pattern for a beginner to remember, but it requires you to tune 2 of the 3 strings by ear.
Left to Right (Midsection)
Left to Right (Treble)
Requires 2 mutes. This pattern is more confusing than Pattern 1, but you don’t have to tune unisons by ear. Strings are tuned in order right to left.
Individual Strings (Midsection)
Individual Strings (Treble)
Requires 2 mutes. Like Pattern 1, this requires aural (by ear) tuning of 2 strings per note. This is a very fast pattern, as it requires only 1 mute movement for every 3 strings tuned, but it’s probably the the most confusing pattern for beginners, as it requires you to jump around a lot with the tuning lever. I don’t recommend this if you’re only tuning your own piano because of the higher risk of getting on the wrong pin, but if you’re thinking of becoming a professional, it’s something to consider.
Leapfrogging Mutes
This is an advanced method that involves tuning two unmuted strings at the same time. Here’s a link for more information on that technique: https://howtotunepianos.com/dsu-info/. Also recommended for prospective professional piano tuners. It’s comparable in speed to the leapfrog method because it requires only one mute movement for every 6 strings tuned.
Turning the pin
With the lever firmly on the tuning pin, turn the pin clockwise to tighten the string and raise the pitch, or counter-clockwise to lower the pitch. Use small movements, because just a slight turn will make a big difference in pitch. Spend some time practicing before you attempt to tune the whole piano.
Some tuners advocate “smooth pull” tuning where you turn the lever in smooth continuous motions. Others use a rougher style where they bump or jerk the lever in the desired direction. Try both methods and see what works for you and your piano.
You may notice that when you first start to turn the pin, you don’t hear or see a change in pitch immediately. This is due to friction…the friction of the pin turning in the “pinblock” (the piece of hard multi-ply wood the pin is embedded in) and the friction of the string itself sliding across the places between the tuning pin and the “speaking length” of the string. Pay attention to the lag, and learn to work with it. Sometimes the string will stick and slip suddenly, making the pitch of the note hold steady while you turn the pin and then jump several cents at a time. You can often work around this by shorter, more jerky movements with the tuning lever that cause the string to jump sooner than it would with a smooth pull. Sometimes you might you notice that the pitch changes before you feel the tuning pin turn in the pinblock. This comes from the pin flexing from side-to-side and twisting slightly in the direction you’re turning it. You can partially work around this by adjusting the angle of your tuning lever to be parallel to the string so that the side-to-side flexing of the pin doesn’t change the tension of the string. A more jerky technique can also help when dealing with flexy pins.
How close is close enough?


If you’re tuning a piano for the first time, don’t get too caught up in trying for perfection. When tuning to PianoMeter or TuneLab, try to get the spinning/sliding strobe bars to stop.
TuneLab has a little orange bar above the note name that fills when a note is “close enough”. Try to get that at least 1/4 filled, the more the better.
On PianoMeter, pay attention to the needle and cents readout. If you can get it within +/- 1 cent of zero, that’s good. Within half a cent is amazing, but you probably won’t get that kind of precision on your first tuning. You will get a feel for how slowly the strobe rings spin when you are within 1 cent. Note: sometimes you may notice that it’s impossible to get all the strobe rings to stop for certain notes. Some will spin slowly left while others spin slowly right, when a note is perfectly in tune. That’s just fine. The goal is to get them all to stop “on average”.
If you’re dealing with a jumpy tuning pin and have to choose between having the string 1 cent flat or 1 cent sharp, choose 1 cent sharp.
The three strings of each note (called a “unison”) should typically be within 1 cent of each other, regardless of whether you are tuning them by ear or individually to the app.
Stability: setting the pin and string
This section is all about tuning stability: How to tune the piano so it will stay in tune for months instead of hours.
In the above sections we briefly mentioned the friction of the tuning pin turning in the pin block and the string sliding along the contact points between the tuning pin and the speaking length. In this section, we’re going to learn how that friction affects tuning stability.

Setting the Pin
The tuning pins are embedded in a slab of multi-ply hardwood called the pin block. Friction between the wood and the metal is all that prevents the pin from turning under the tension of the string. This friction is so great that, when you turn the pin from the top with a tuning lever, the bottom of the pin lags behind a bit. When you first start to apply torque to the pin with the lever, the top of the pin will flex a bit, but without actually turning in the pin block. Sometimes it twists so much that you can hear as a change in pitch as you are playing the string. As you pull on the lever harder to apply more torque, the top of the pin will start to turn in the pinblock, and finally the bottom of the pin will begin to move.
Setting the pin is all about making sure that the tuning pin is in equilibrium. If the top of the pin is twisted in one position and the bottom of the pin is in a different position, the pin could “relax” after you’ve finished tuning, resulting in a piano that goes out of tune faster than normal. Setting the pin takes practice, but here are some tips that will help:
- Pay attention to the feel of the lever while you’re turning it. You should be able to feel when the pin begins turning in the block. A stiffer lever will help with this.
- Don’t try to tune exactly to pitch in one smooth pull. Doing this leaves a large internal torque in the pin that can relax later. If you watch an expert tuner, you will notice that they often overshoot the pitch slightly and then come back to it, going above the pitch, then back down, centering in on the pitch with increasingly small movements.
- Try shorter jerky movements instead of a smooth pull on the lever. By making the pin jump slightly, you might be able to overcome some of the effects of static friction that cause the pin to end with a twist in it. (Using an impact lever on uprights is an extreme example of this.)

Setting the String
In the diagram of a grand piano string above, there are two friction points on the string between the tuning pin and the speaking length. When you turn the pin, the string must slide over these friction points to change the tension (and pitch) of the speaking length. But because static friction is higher than sliding friction, sometimes the string doesn’t slide when you turn the pin a small amount. This leads to an imbalance of tension between the tuning pin portion and the speaking length.
Imagine that you have just finished tuning a string, and the last movement that you made with the lever was to loosen the tuning pin slightly. That decreased the tension on the tuning pin side of the friction point, making the string want to slide towards the speaking length a bit. But because it was a small last adjustment, friction didn’t allow the string to slide, and there’s now an imbalance in tension, with the string wanting to slide, and the pitch wanting to go flat from where you set it. The next time someone plays the piano hard, the vibrations from the piano hammers pounding on the strings could cause the string to slip, and suddenly you have a note that slipped out of tune.
“Setting the string” means making sure the tension is equal on both sides of the friction points. Here are two ways to set the string.
- Test blows: One simple way to set the string is to do the hard playing mentioned above as you tune. When you think the string is in tune, play the note 2-3 times at a fortissimo volume to shock the string and make it jump and slide over the friction points. Keep in mind that excessively hard test blows are not good for the piano or your ears.
- Rocking the pin: When you think a note is in tune, use a gentle force to rock the lever on the tuning pin in the direction that flexes the pin sideways instead of turning it. You’ll need the lever oriented around 12:00 for this to work, so the rocking motion can apply gentle shocks down the length of the string. These shocks cause the string to slide over the friction points in both directions as you rock the lever back and forth. If you end the rocking gently, the string should end up in a stable place.
Both “setting the string” methods above will make the note go out of tune if the string wasn’t properly set, so you’ll have to re-tune the string and re-set the pin if it slipped significantly.
As you gain experience you will get faster at setting the pin and string and learn to anticipate how much you need to overshoot the pitch to get it in tune and stable. You may even learn how to set the pin and string at the same time.

A final word about tuning unisons
A “unison” is the word piano tuners use to refer to the 2 or 3 strings of a single note being played together. Ideally the strings in a unison should be tuned as closely in pitch as possible to each other so they give a pure sound when they’re played together. Clean unisons are perhaps the most important part of a piano tuning, and out of tune unisons are one of the first things people notice when a piano goes out of tune.
If you are tuning the 3 strings of a unison individually with an app, each string should be within 1 cent of the other strings. But even if you are using this method, you should learn to hear what a good unison sounds like.
Beating
When two strings are played together, their vibrations can interact with each other through the soundboard of the piano. If the strings are vibrating in phase (going up and down together) then the sound from them is louder. If they are vibrating out of phase (one goes up while the other goes down) then they cancel each other out and the sound is softer. If the strings are not tuned to the same frequency, then the vibrations will go in and out of phase with each other. Imagine one string tuned to 440 Hz that vibrates 440 times per second, and another string tuned to 439 Hz. That means that once per second, the strings will be vibrating in phase, and then a half second later, they will be vibrating out of phase. The resulting tone will have a “wah-wah-wah” sound that gets louder, then softer, then louder again, once per second. Piano tuners call this “beating”. If the strings are more out of tune with each other, the beating is faster.
Tuning by ear
When you tune one string to another by ear, you listen closely to the “wah-wah” beating sound and try to make it slow down and stop. If the string you are tuning is too flat or sharp, the beating will speed up. The beating stops when the two strings are perfectly in tune.
Further resources
This section gives further resources for people aspiring to become professional piano technicians.
Piano
Technicians Guild
A professional association for piano technicians. They recently rolled out an education hub for new technicians.
How To
Tune Pianos
An online piano technician training program.
Piano
World
An open forum for piano enthusiasts with a specific forum for “tuner-technicians”. (Best visited with an ad blocking extension these days though.)
© 2024 Tune Your Own Piano. All Rights Reserved
